You know that one sad chair in the garage? The one with a missing seat, wobbly legs, and the emotional energy of a forgotten cafeteria tray? Good news: it’s about to become the star of your porch, patio, or garden. In this tutorial for adding chicken wire to a chair for flowers, we’ll turn a tired chair into a charming “chair planter” that looks like you bought it at a boutique… but with the smug satisfaction of knowing you didn’t.
The secret weapon is chicken wirenot just for chickens (they already have enough going on). In floral and garden DIY, chicken wire acts like a flexible framework: it holds stems, supports soil, and creates that “nest” that keeps everything from sliding into chaos. Pair it with coir (coconut fiber), burlap, or moss, and you’ve got a sturdy little flower-hammock right where a seat used to be.
We’ll cover a full step-by-step build, plus design ideas, troubleshooting, and a longer “real-world experience” section packed with the kinds of lessons people usually learn the hard way (like discovering wire ends with your palm10/10 do not recommend).
Why Chicken Wire Works (and Why Your Flowers Will Thank You)
Chicken wire is a classic “mechanic” in floral design because it creates structure without blocking water the way foam can. Florists use it to stabilize heavy stems and keep arrangements airy and natural-looking. In chair planters, that same strength becomes a lightweight basket that supports liners and soil.
A few nerdy-but-useful details: floral chicken wire is often around 24-gauge and painted green to help it hide and resist rust longer. It’s flexible enough to shape, but rigid enough to hold form once secured. In other words: it’s basically the supportive friend your plants deserve.
Pick the Right Chair (So Your Project Doesn’t Turn Into Modern Art)
Best chair features
- Removable or broken seat: If the seat is already missing, you just saved yourself 20 minutes and one dramatic sigh.
- Solid frame: Wobbly legs are cute until you add wet soil and gravity joins the chat.
- Weather-ready material: Metal lasts longer outdoors; wood can work great if you protect it.
- Safe finish: If the chair is old and has “vintage chippy paint,” consider the possibility of lead-based paintdon’t sand it casually.
Quick stability check
Put the chair on a flat surface and press down on each corner. If it rocks, tighten fasteners, add wood glue where appropriate, or reserve it for a covered porch where wind and rain aren’t constantly stress-testing your life choices.
Tools & Materials Checklist
Here’s what you’ll want on hand before you begin:
- Chair with an open seat area (or a seat you can remove)
- Chicken wire (standard hardware-store wire works; “floral chicken wire” can be softer/easier to shape)
- Wire cutters/snips
- Work gloves (seriouslywire ends are tiny villains)
- Staple gun + staples (best for wooden chairs) or floral wire/zip ties (great for metal chairs)
- Needle-nose pliers (for folding sharp ends inward)
- Liner material: coco coir liner, burlap, sphagnum moss, or landscape fabric
- Potting mix (lightweight outdoor container mix is ideal)
- Plants or flowers (annuals, herbs, succulents, or a mix)
- Optional protection: outdoor sealer, polyurethane, hemp oil, or exterior paint
- Optional drainage solution: a hidden plastic pot, saucer/tray, or extra landscape fabric
Step-by-Step: Adding Chicken Wire to a Chair for Flowers
There are a few variations out there, but the core idea is the same: make a wire “bowl,” attach it securely, line it so soil stays put, then plant. We’ll build the most reliable version first, then give you options depending on where the chair will live.
Step 1: Strip the seat area
Remove any cushion, caning, fabric, or seat insert. For many chairs, you can unscrew the seat from underneath. If it’s already broken, remove loose bits and any staples or rusty hardware that could snag you later.
Step 2: Shape the chicken wire into a basket
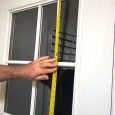
Cut a piece of chicken wire a few inches larger than the seat opening on all sides. Center it over the opening, then press down to form a shallow-to-medium “bowl” shape. Aim for about 4–6 inches deep for shallow plantings, or deeper (8–12 inches) if you want more soil volume.
Pro move: if shaping feels like wrestling an angry spring, use a bowl, colander, or bucket as a mold. Press the wire around it to get a smoother curve.
Step 3: Attach the wire securely (choose your method)
For wooden chairs (staple method):
- Pull the wire edges tight over the seat frame.
- Staple around the perimeter, working from back to sides to front.
- Add extra staples where soil weight will pull most (usually the front edge and corners).
- Trim excess wire, leaving enough to remain locked under staples.
For metal chairs (tie-on method):
- Wrap the wire edges around the metal seat frame.
- Use floral wire or zip ties every 3–4 inches to bind the wire to the frame.
- Add a second cross-layer of chicken wire if the seat opening is wide or you want extra support.
Step 4: De-spike the danger zones
Chicken wire ends are sharp. After trimming, use needle-nose pliers to bend every cut end inward or wrap it around the frame. Run your hand nearby (carefully, with gloves) and fix anything that feels like it wants to bite you later.
Step 5: Line the basket (soil containment + drainage)
Your liner does two jobs: keeps soil from escaping and slows drying. You have a few good options:
- Coco coir (coconut fiber) liner: classic hanging-basket material, breathable, and looks great.
- Burlap: rustic and easy; double it if the weave is open. It should hold soil but not trap water.
- Sphagnum moss: fantastic for tucking into wire and covering edges; pre-soak it so it molds easily.
- Landscape fabric: the “secretly practical” choiceespecially if you hate finding potting soil on your shoes.
For the cleanest look, pull the liner up and over the rim so it hides the wire. Secure it with staples (wood chair) or a few discreet ties (metal chair). If you want extra polish, add trailing plants that drape over the seat edge and hide everything naturally.
Step 6: Choose your “flower style” (3 great options)
Option A: Live flowers planted directly in the chair (classic chair planter)
- Add potting mix to about 2/3–3/4 full.
- Arrange plants (still in pots) on top to test spacingthen remove and plant.
- Use the “thriller, filler, spiller” rule: one taller focal plant, a few medium fillers, and at least one trailing plant.
- Firm soil gently, water thoroughly, and top with a little mulch or moss to reduce splash and drying.
Example combos: petunias + calibrachoa + trailing vinca for sun; impatiens + coleus + creeping jenny for shade; herbs like basil/thyme + nasturtium for edible charm.
Option B: Hidden pot method (easiest maintenance)
If you want less mess and easier watering, place a standard nursery pot or plastic planter inside the wire basket. You still use chicken wire to create the support “seat,” but the pot holds the soil. This is great if you want to swap plants seasonally without rebuilding the liner each time.
Option C: Cut-flower chair arrangement (table centerpiece energy)
Want a chair that holds fresh-cut flowers instead of live plants? Hide a watertight container (a bucket or wide jar) inside the lined basket. Then use a small ball/pillow of chicken wire inside that container to help hold stems in placesimilar to how florists stabilize arrangements in wide-mouth vases.
Design Ideas That Make People Say “Wait… You Made That?”
1) The front-porch “welcome” chair
Paint the chair a bold color, then plant a tight, bright mix (think zinnias, marigolds, and trailing sweet potato vine). Place it near your entry for a cheerful “I have my life together” vibe, even if you ate cereal for dinner.
2) The garden-path “storybook” chair
Go softer: leave wood weathered or seal it lightly, then plant whites and purples with trailing greens. Add a small solar light behind it for nighttime charm.
3) Seasonal swaps
- Spring: pansies, violas, primrose, ivy
- Summer: petunias, geraniums, lantana, trailing verbena
- Fall: mums, ornamental kale, creeping jenny
- Winter (mild climates): evergreen clippings + pinecones in a hidden pot
Care & Longevity: Keep It Cute All Season
Watering
Chair planters often dry faster than ground beds because air hits them from all sides. Check moisture with your fingerif the top inch is dry, water. In hot weather, daily watering may be normal, especially if your liner is coir or moss-heavy.
Drainage
Drainage is non-negotiable. Use a breathable liner and avoid compacting soil into a soggy brick. If you’re using a hidden pot, make sure it has holes and consider placing a saucer underneath if you’re on a porch.
Weather protection
For wood chairs outdoors, consider sealing with an exterior finish. For metal chairs, watch for rustgreen floral wire can help reduce visibility and slow rusting, but long-term exposure still wins eventually. Covered porches dramatically extend the life of your project.
Troubleshooting (Because Nature Has Opinions)
Problem: The wire sags under soil weight
- Use a second layer of chicken wire at a cross-angle for support.
- Increase staple/tie points, especially at corners and the front edge.
- Reduce soil depth slightly and use lighter container mix.
Problem: Soil leaks out the sides
- Double-layer burlap or add landscape fabric inside the liner.
- Use moss around the rim and gaps to “seal” the edges.
Problem: Plants dry out too fast
- Add a top layer of moss or mulch.
- Choose more drought-tolerant plants (succulents, lantana, thyme).
- Move the chair to morning sun / afternoon shade if possible.
Problem: The chair tips in wind
- Place it against a wall or in a sheltered corner.
- Add weight low: a brick or small paver hidden near the base can help.
- Use shorter, mounded plants instead of tall “sail” plants.
Safety Notes (Short, Serious, and Worth It)
- Wear gloves and eye protection when cutting wire.
- Fold or tuck sharp endsfuture-you will be grateful.
- If the chair has old paint and you suspect lead, avoid sanding; consider sealing it or choosing a different chair.
- Keep wire scraps away from pets and kids.
Real-World Experiences: The “Wish I Knew This Earlier” Section (Extra Detail)
People usually think the hard part is shaping chicken wire. Plot twist: the hard part is everything after the first watering. Here are the most common real-life lessons DIYers run into when making a chair planter, explained in a way that saves you from learning them at maximum inconvenience.
1) The chair gets heavy fastplant where it will live
A chair planter is adorable until you add wet soil and a full-grown plant. Then it becomes a “two-adults-and-a-pledge” kind of lift. The most common regret is building the whole thing on a workbench, admiring it, and then realizing it needs to move 40 feet across the yard. If you can, assemble the wire and liner in the garage, then carry the empty chair to its final spot before adding soil and plants.
2) Drying happens faster than expected (especially with coir)
Coco coir liners breathegreat for roots, but they also let moisture evaporate quickly in sun and wind. Many people end up watering more often than they planned, especially in midsummer. The easiest fix is a top dressing: moss, mulch, or even decorative pebbles in small gaps. The second fix is plant choice: succulents and heat-tolerant annuals forgive missed waterings better than thirsty blooms.
3) Sharp wire ends don’t announce themselves
Wire injuries are rarely dramatic; they’re just annoying and strangely personal, like the chair waited for you to get confident. The most effective habit is doing a “perimeter check” after trimming: fold every cut end inward with pliers, then add a rim of moss or liner folded over the edge. If you’re placing the chair where people might grab it (porch traffic!), take the extra two minutes to make it hand-safe.
4) The prettiest arrangement is planned like a tiny landscape
The best-looking chair planters almost always follow a simple composition: a taller “anchor” plant toward the back, medium bloomers across the center, and at least one trailing plant spilling forward. Without that structure, the planter can look like a confused salad. A quick “dry layout” (setting plants on top while still in their pots) helps you see the final shape before you commit.
5) Weathering is realchoose your chair finish intentionally
Outdoors, wood can swell, crack, or soften at joints. Some DIYers embrace the patina; others prefer protection. Both are valid. If you want it to last, sealing or painting helps. If you love the aged look, place the chair under cover and let time do its thing more gently. Metal chairs generally last longer in open weather, but wire and metal together can still rust over timeespecially in humid climates.
6) A hidden pot is the “low-drama” upgrade
If you’re the kind of person who enjoys the concept of daily watering but not the reality, the hidden pot method is your friend. It makes seasonal swaps painless: pull out the pot, drop in a fresh one, and suddenly your chair has a whole new personality. It’s also great for events (weddings, parties, garden tours) because you can prep plants elsewhere and install them at the last moment.
7) The “chair planter” becomes a conversation magnet
This is the fun part: people notice chair planters. They ask where you bought it. They take pictures. They assume you’re the kind of person who owns matching patio furniture (you can let them keep believing that). It’s one of those projects that looks whimsical and intentional, even if you built it in old sneakers while negotiating with a staple gun.
Bottom line: this project rewards small extra stepsmore staples, a better liner fold, a quick stability check, and a thoughtful plant layout. Do those things and your chair becomes a blooming “feature,” not just a crafty experiment you hide behind the shed.
Conclusion
Adding chicken wire to a chair for flowers is one of the most satisfying upcycles because it blends practicality and charm: the wire creates a strong basket, liners keep soil where it belongs, and your plants get a fun stage to perform on. Choose a stable chair, secure the wire like you mean it, line it well for drainage, and design your planting like a mini garden scene. Then stand back and enjoy the fact that your “broken chair” just got promoted to outdoor décor icon.


